Customized WordPress Admin Settings Utilizing Gutenberg

Iain Poulson over at Scrumptious Brains not too long ago wrote an article entitled, 5 Methods to Create a WordPress Plugin Settings Web page. It’s a superb breakdown of various approaches that builders can take when constructing settings pages for WordPress plugins.
Iain’s article impressed me to share my very own strategy to this course of because it has modified fairly a bit. Let’s dive in and have a look!
- My Plugin Philosophy
- The React Approach
- How WordPress Manages Parts
- Utilizing the Parts
- Managing Settings Information
- An Instance: ShopWP 3.0
- Extra Assets
My Plugin Philosophy
As a WordPress developer, I’ve come to the conclusion that Gutenberg isn’t going wherever. Say what you’ll about Traditional Editor, or ClassicPress—the way forward for WordPress is undeniably, Gutenberg. Personally, I really like that instruments like ClassicPress and Traditional Editor exist. They’re implausible, and kudos to the individuals who made them!
On the similar time, as a plugin developer (and in the end enterprise proprietor), I wish to ensure that my product is adapting to the most recent applied sciences. Extra importantly, I wish to ensure that my plugin follows the “WordPress manner” of doing issues. I believe that is essential for giving customers a “acquainted expertise” to what Core offers by default. I don’t need my customers to context swap when utilizing my product—whether or not visually or functionally.
So what does this imply for constructing admin settings pages?
The React Approach
As Iain mentions in his article, The WordPress world has adopted React as a base know-how in core. Identical to they did with jQuery so a few years in the past. With every core replace, React serves an increasing number of as the inspiration for all the pieces UI associated.
So, I’m additionally constructing my admin settings in React now
I’d wish to stroll by how I’m doing this for the remainder of the article. I’m going to imagine that you simply’re acquainted with React. Nevertheless in the event you use Vue or Angular as an alternative, the examples I’m displaying right here ought to at the least make conceptual sense.
Let’s go!
Setting issues up
Earlier than I can start constructing the React app for the settings, I must get the precise admin web page working. I often do that utilizing code just like this:
perform plugin_admin_page() {
   include_once WP_SHOPIFY_PLUGIN_DIR_PATH . 'admin/partials/wps-admin-display.php';
}

perform add_dashboard_menus() {
   add_menu_page('ShopWP', 'ShopWP', 'manage_options', 'wpshopify', 'plugin_admin_page', $icon, null);
   add_submenu_page('wpshopify', 'Settings', 'Settings', 'manage_options', 'wps-settings', 'plugin_admin_page');
}

add_action('admin_menu', 'add_dashboard_menus');
In case you’re unfamiliar with what’s happening, the above code will principally add a brand new Menu merchandise to WordPress for our plugin. We’re then telling WordPress to load the wps-admin-display.php file when the person opens our newly created settings web page.
After including this to our plugin, we’ll be offered with a clean web page that appears one thing like this. The rationale it’s clean is as a result of we’re additionally assuming that we haven’t added something to wps-admin-display.php but.

Observe: I’m deliberately being sparse in particulars of this course of as the primary function of the article shall be to concentrate on the React aspect of issues. For a extra detailed rationalization take a look at Iain’s article.
Including the Entry Level
Now that the settings web page is working we have to add our “entry level” for our React app. We are able to do that by including the beneath HTML into the wps-admin-display.php file.
<div id="wpshopify-app-settings"></div>Okay, now the enjoyable begins.
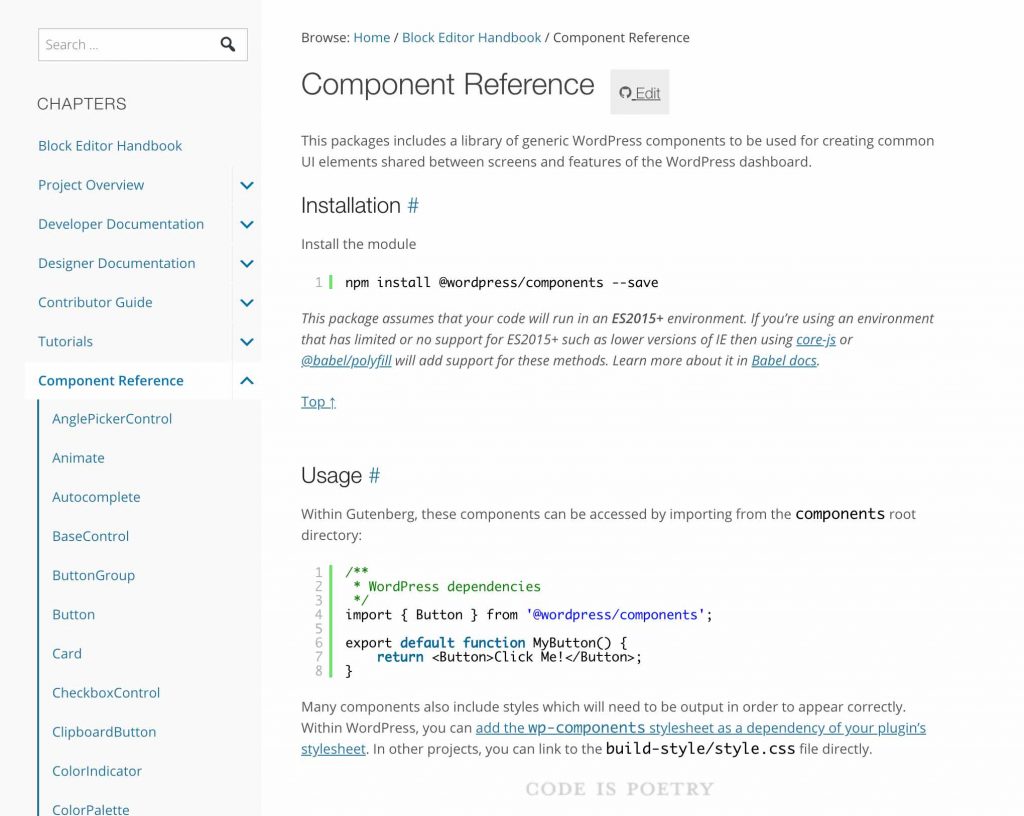
How WordPress Manages Parts
As I discussed earlier, the fantastic individuals behind WordPress have open-sourced lots of the core parts utilized in Gutenberg. This contains easy issues like enter fields, spinners, shade swatches, and so on. Builders can then pull these parts into their very own tasks. Superior proper?
This brings me to a bigger level: we as builders now have a manner of reusing core parts which can be confirmed to work. We now not must reinvent textual content fields, loading spinners, or write customized CSS to “match” what core shows.
That is big! Not just for productiveness however for total code high quality and upkeep.
So the place do you discover these parts? You could find a full listing right here.
Utilizing the Parts
There are presently two methods to eat these parts in your individual venture. You may both use the npm package deal @wordpress/parts , or depend on the worldwide wp.parts variable. There are execs and cons to every.
One of many advantages of utilizing the @wordpress/parts package deal immediately is that you simply’ll have entry to some parts that haven’t been pushed to core but. For instance, the Card and CardHeader parts.
One other profit is that you would be able to begin utilizing these parts now, even when you need to help customers who’re utilizing WordPress beneath model 5.0.
A profit to utilizing the built-in wp.parts variable is that you simply received’t must bundle and ship the parts library in your plugin or theme. This may doubtlessly be an enormous financial savings in asset dimension as a result of it’s also possible to exclude React and ReactDOM out of your bundle. Nevertheless this assumes you’re solely supporting WordPress 5.0 +.
On the finish of the day the choice shall be as much as you, however right here is an instance of how one can load the Spinner part utilizing each approaches:
Utilizing @wordpress/parts:
import { Spinner } from '@wordpress/parts';Utilizing wp.parts
const { Spinner } = wp.parts;Each of those approaches will produce the next:
The Native Method: Requiring Dependencies
Constructing on the above <Spinner> part instance, in the event you determine to make use of wp.parts there may be one further step that must be taken earlier than this can work.
Whereas WordPress will will let you use these parts, you need to first inform WordPress that your plugin relies upon on them. You are able to do this by including wp.parts to the dependency array if you enqueue your types and scripts. Right here’s an instance:
Enqueue types:
wp_enqueue_style('my-styles', 'dist/admin.min.css', ['wp-components']);Enqueue scripts
wp_enqueue_script('my-scripts', 'dist/admin.min.js', ['wp-element', 'wp-components'], '', true);Discover right here that we’re additionally including wp-element to our scripts. That is to make sure that WordPress masses React beneath the wp.aspect variable.
Managing Settings Information
I believed I might contact shortly on this a part of the method as a result of it has modified fairly drastically as effectively.
In my prior strategy, I might lean closely on accessing the settings information inside PHP. For instance, earlier than together with my settings web page I might fetch all of the settings information from the database. Then I might set the HTML kind inputs with the info. This works after all, however it isn’t the way in which I’m doing issues now.
As a result of I’m rendering the shape inputs on the client-side, I want a approach to cross the state of the present settings into the React app on every web page load. I’m doing this by the wp_add_inline_script perform.
public perform stringify_settings($settings) {
   return "const wpshopify = " . wp_json_encode($settings) . ";";
}

wp_add_inline_script('wpshopify-scripts', $this->stringify_settings($this->get_settings()), 'earlier than');
The wp_add_inline_script perform lets you add arbitrary JavaScript earlier than or after a registered script. So right here, I’m including a worldwide variable known as `wpshopify` which incorporates all the plugin settings. Since this world is obtainable earlier than my predominant plugin JS script runs, the React settings app can simply use them.
Right here’s an instance of how I’m bootstrapping the preliminary settings state in React:
perform SettingsInitialState(props) {
  const settingsModified = underscoreToCamel(wpshopify.settings.basic)

  return {
    ...settingsModified,
    isLoadingPages: true,
    availablePages: false,
    isLoadingCollections: true,
    availableCollections: false,
    siteUrl: wpshopify.misc.siteUrl
  }
}

export { SettingsInitialState }
A few of you might scoff at using a worldwide variable and truthful sufficient! Nevertheless WordPress makes use of them and so long as you namespace them successfully I don’t essentially seen a problem. Till WordPress implements one thing higher I believe this can work superb.
An Instance: ShopWP 3.0
Under is a screenshot of how the upcoming ShopWP 3.0 admin settings web page is wanting to date.
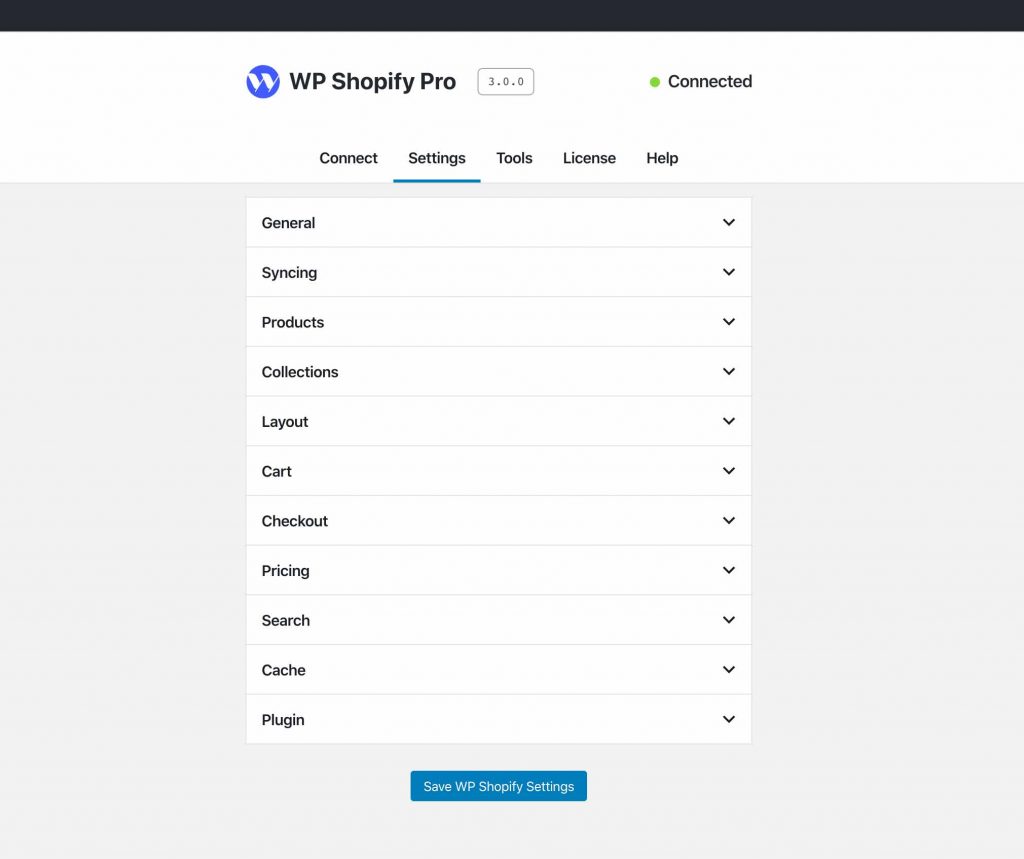
To determine how the general format would look, I took inspiration from two locations: the brand new Website Well being settings and the upcoming block listing designs.
Many individuals haven’t seen the block listing designs but, however listed here are the present Figma design prototypes. I discovered this whereas listening to the current Gutenberg Occasions podcast.
It doesn’t look like there’s a real “normal” but, however my very own strategy shall be to imitate Core as a lot as attainable. Whether or not or not the format is centered or left justified is immaterial. What’s essential is that we’re utilizing the person parts.
Extra Assets
Surely, the only finest useful resource I’ve discovered that covers utilizing these new React parts is Zac Gordons JavaScript for WordPress. Particularly, I acquired probably the most worth from his Gutenberg Block Improvement and Superior Gutenberg Improvement programs.
Hope this was useful! Keep tuned for the subsequent replace.
See ya.
,